
This year, I learnt to create 3D models on a software called Rhinoceros (I simply call it Rhino) as a part of my architecture course. Compared to other CAD (computer-aided design) software, Rhino has its focus on the great flexibility of the forms (such as NURBS model) and the ease of use. As I learnt the basic commands on Rhino, it has opened up a great possibility of the design and the structure that I wouldn’t have achieved by hand drawing. On this article, I would like to talk a bit about how I use Rhino.
Firstly, the spec! I use the student version of Rhino on Windows 10 using Parallels on Mac. I am more familiar with Mac but I wanted to have Windows version of Rhino (there is a difference of the interface between on Win / Mac platforms, and a majority of architectural firms use Windows) so I chose to have Parallels rather than Bootcamp.
I must say, this is the best decision I made because I can open both Mac and Windows at the same time side by side, copy and paste files from one to another, export images on Windows and open them on Mac immediately.
When I open the file, I always try to make sure that I am:
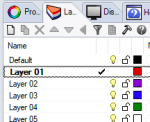
1. Working on the correct layer: The tick sign next to the layer name tells which layer you are currently working on. The layer doesn’t change when you select an object that doesn’t belong to that layer, and all the objects created will be under the selected layer. Although you can still move objects to different layers, it is always good to select the right layer first to save time.
2. Using top view for creating planar (2D) objects on the C-plane: In Perspective view, it can be difficult to tell whether the object you are creating is planar (flat/developable) or not. When I simply need a flat shape, I go to Top view to draw the shape. Also, I often use the command ‘ProjectToCPlane’ to make sure that the object is flat.
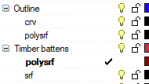
3. Creating sub-layers for keeping different objects (e.g. one layer for lines, another for surfaces, etc.): Having sub-layers for different types of objects allows you to select a group by going right-click -> ‘Select Sublayer Objects’ and hide and show components you want without manually selecting them and using ‘Hide’ command every time.
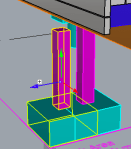
4. Creating copies using Gumball & alt key: Since creating a 3D model is a step-by-step process, I create a copy as I make major changes. This way, I can keep track of modifications I made, and go back to the old design if one thing didn’t work out.
5. Naming files clearly: It’s very easy to put random titles for files, but giving titles based on types of work you did, or what the model is for, or including numbering system is very crucial for managing the files.
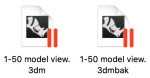
6. Keeping the backup file: There is a file with format .3dmbak which is made automatically as you create a new file. It contains contents from Autosave. In the past, this has saved my life for a couple of occasions (when the main file was ruined by Rhino overwriting different thing for no reason). So don’t underestimate what it can do.
And here are some of the commands I use frequently:
- ‘Move‘ with Osnap for positioning a point of object at the specific point
- Gumball for moving only on one plane (e.g. x, y or z plane) & at specific numerical values (e.g. 500mm to positive direction of x-axis)
- ‘Rotate‘ for rotating from specific point (use different views to change the direction of rotation)
- ‘Polyline‘ with Ortho for drawing curves (type numerical value for length, ‘<‘ for specifying angle)
- ‘Offset‘ or ‘OffsetSrf‘ for creating offset curve/surface
- ‘Trim‘ for deleting segments of an object that intersects with cutting object
- ‘Split‘ for dividing objects at points of intersection
- ‘BooleanDifference‘ for trimming off objects – can be complex
- ‘PlanarSrf‘ for creating planar surface (if it doesn’t work, try ‘CloseCrv‘ and ‘ProjectToCPlane‘ first)
- ‘ExtrudeCrv‘ and ‘ExtrudeSrf’ for creating form (useful for quick massing model)
- ‘Array‘ for creating a series of identical objects (based on the number of objects or spacing between them)
- ‘Loft‘ for creating surfaces from curves
- ‘Contour‘ for creating section lines from surfaces in the specific direction and with set spacing
- ‘Join‘ and ‘Explode‘ for connecting objects / separating one object into individual segments (often ‘explode’ and then de-select one segment I want to change and then ‘join’ the rest of selected segments)
- ‘Make2D‘ for creating the linework from the objects in the view. This allows the lines to be exported to Adobe illustrator so it becomes easy to incorporate it in the presentation.
- ‘ClippingPlane‘ with layouts for generation sections
Since I can type in the word that reflects the action I want to take as a command, the process becomes very smooth as I learn what command to use for what situation. I also use right click on the mouse to repeat the command.
Although I am currently using Rhino by itself, I will be learning to use Grasshopper, which will provide further flexibility in making adjustments as I make the model. I have a lot more to learn, but I’m glad that I made a good start with using Rhino this year.

