What & Why
Research is one of the steps in the design process where you gather and analyse information in relation to your project.
Without research, you can’t make informed design decisions or justify why your decision is a good one. By undertaking research from different angles, you can demonstrate the depth of understanding you have.
Here are my recommendations for the research methods & techniques.
1. Mind map
Mind map is one of the most commonly used components in a student’s folio. Although there’s an idea that there is a ‘correct’ way of mind mapping, I think there are so many ways to do so, in terms of the way you link ideas depending on what you want to get out of it.
It is particularly effective to do in the beginning of the research phase, to kick off your design process. (of course you can do as many times as you want, but keep the track of time you spend on it).

Be mindful of the outcome of the mind map – reflect on how you can use it for further research process.
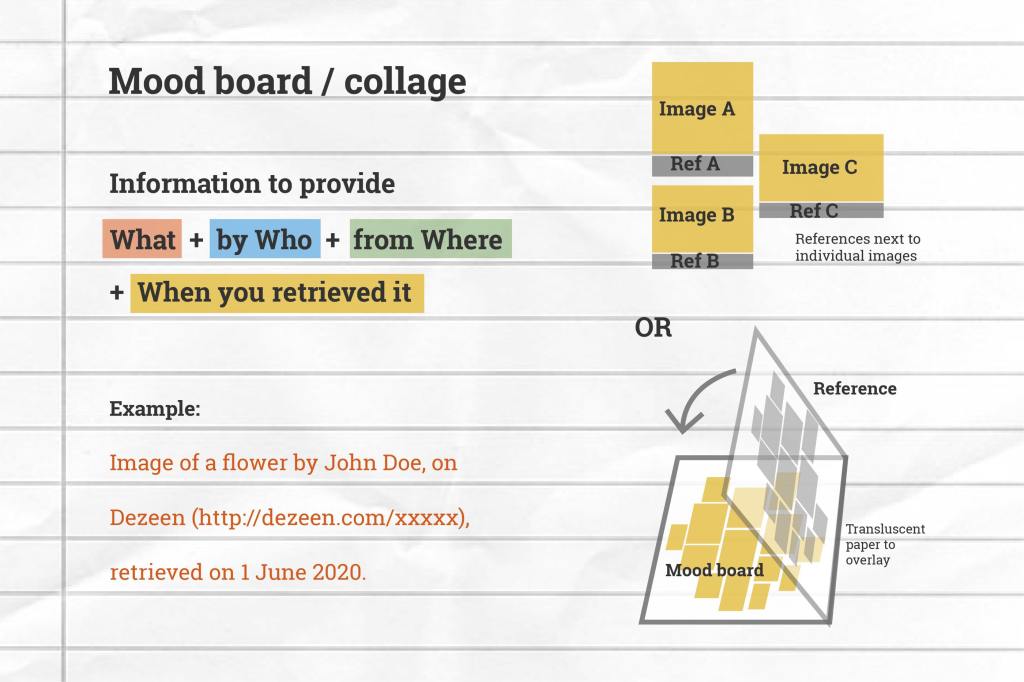
2. Mood board/ Collage/Audience Profile
Mood board or collage is a composition of images often used to represent the demographics of target audience. It is aimed to give you a better understanding of who you’re designing for.
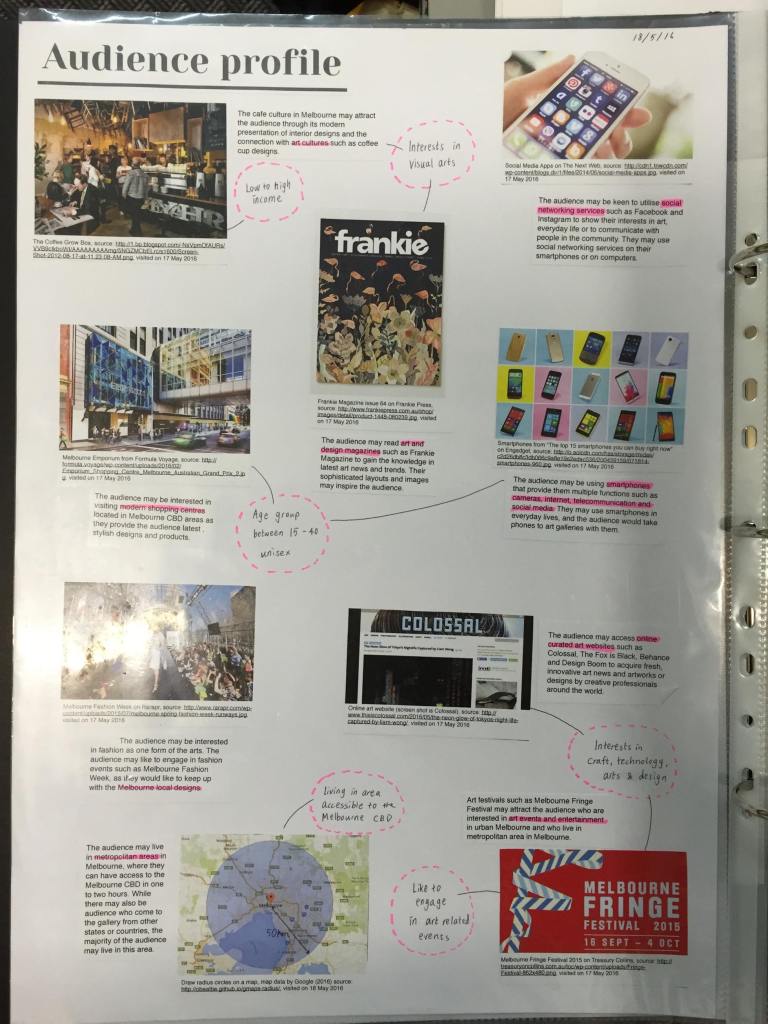
I recommend using the information about target audience in your Brief as a starting point. Consider images of:
- fashion style
- places they like to visit
- what they eat / drink
- gadgets / products they own / brands
- their interests / hobbies
You can also create a mood board / collage for the exploring the design directions. You may want to show:
- colour scheme
- typeface styles
- precedents
- materiality
- atmospheric quality (the kind of ‘vibe’ you want your design to have)
- context (how the visual communication may be seen)
It’s important that you keep the reference to all the images. You can place reference next to individual images, or have the following page (after mood board page) dedicated to mapping all the references, for example using tracing paper.
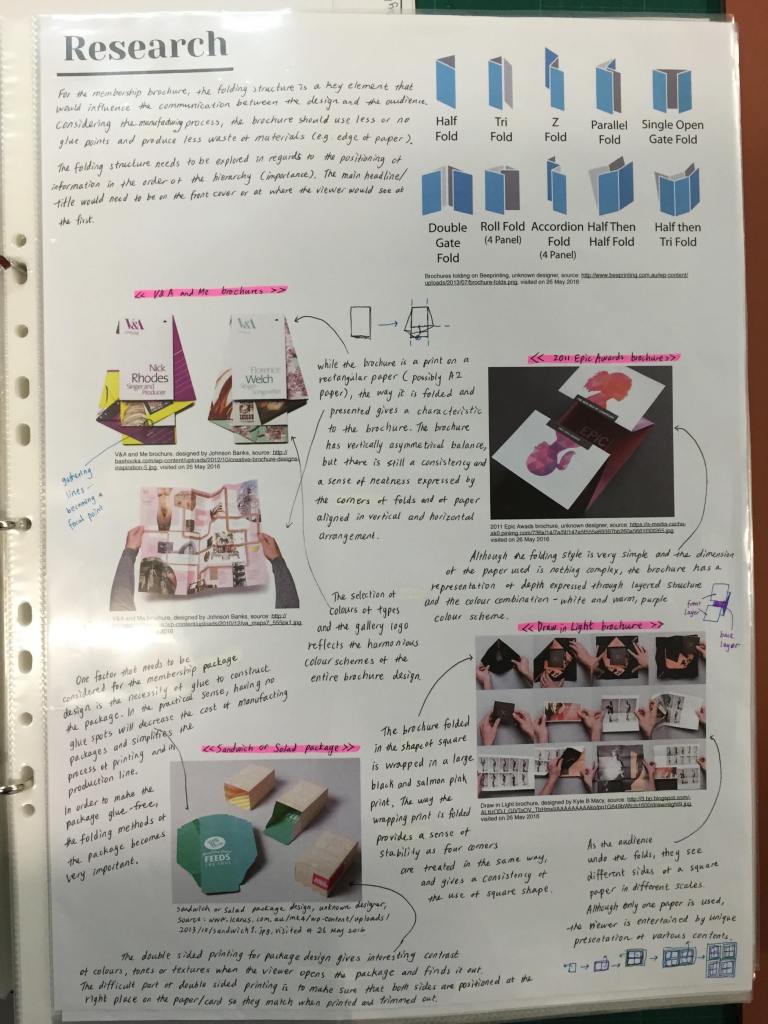
3. Precedents
Precedents are existing works by other designers where you may be sourcing inspirations from. It’s not about showing pretty pictures of those works, but it’s about describing & analysing (you don’t need to have all of them for each):
- what the project is/was about (brief)
- who: the target audience (is it similar to your target audience?)
- how designers approached the brief
- why they took that approach
- Design Elements & Principles (refer ‘How to annotate’ section of Before you start page!)
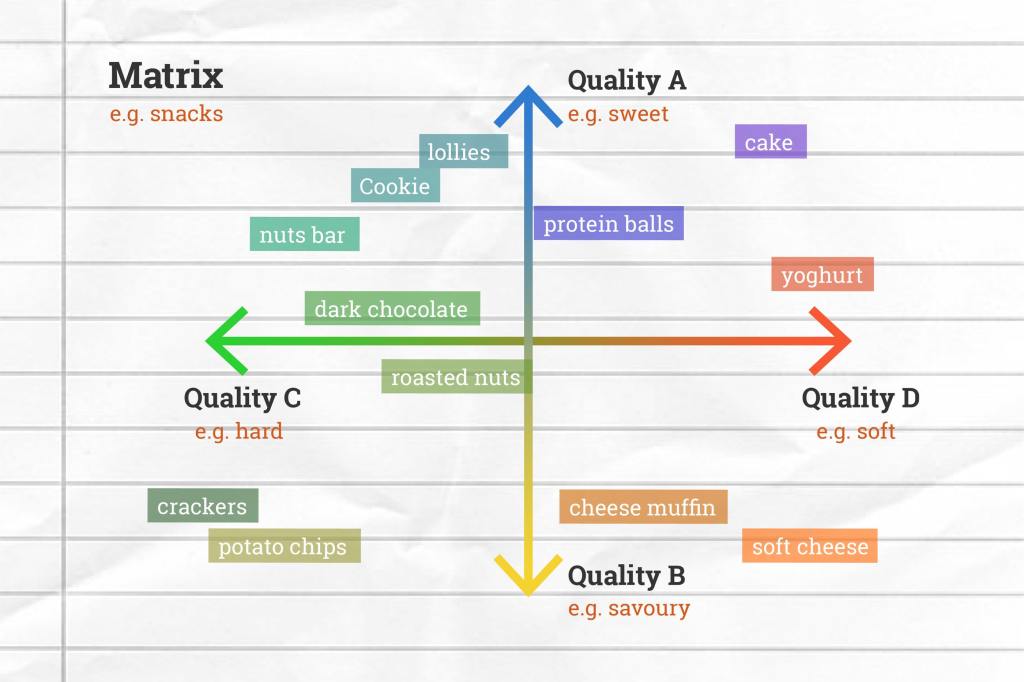
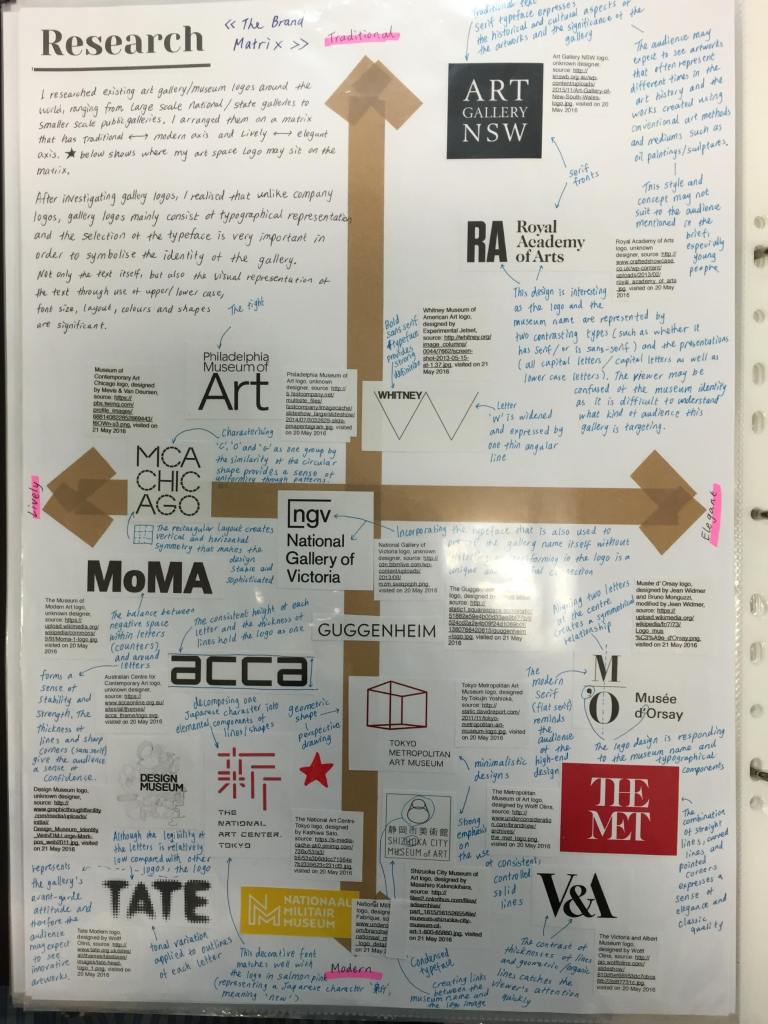
4. Matrix
As part of analysing precedents, you might consider using a matrix to classify precedents on certain key qualities. This can help you understand where you want your design to be ultimately located, and what qualities you might need to explore further in the generation of ideas.
- Choose two opposing qualities x 2 for axes (make sure they’re relevant to the items you are classifying)
- Draw two axes with arrows intersecting perpendicularly
- Label arrow heads
- Locate precedents on the matrix (don’t forget reference!)
- Locate where you want your design to be
- Annotate them
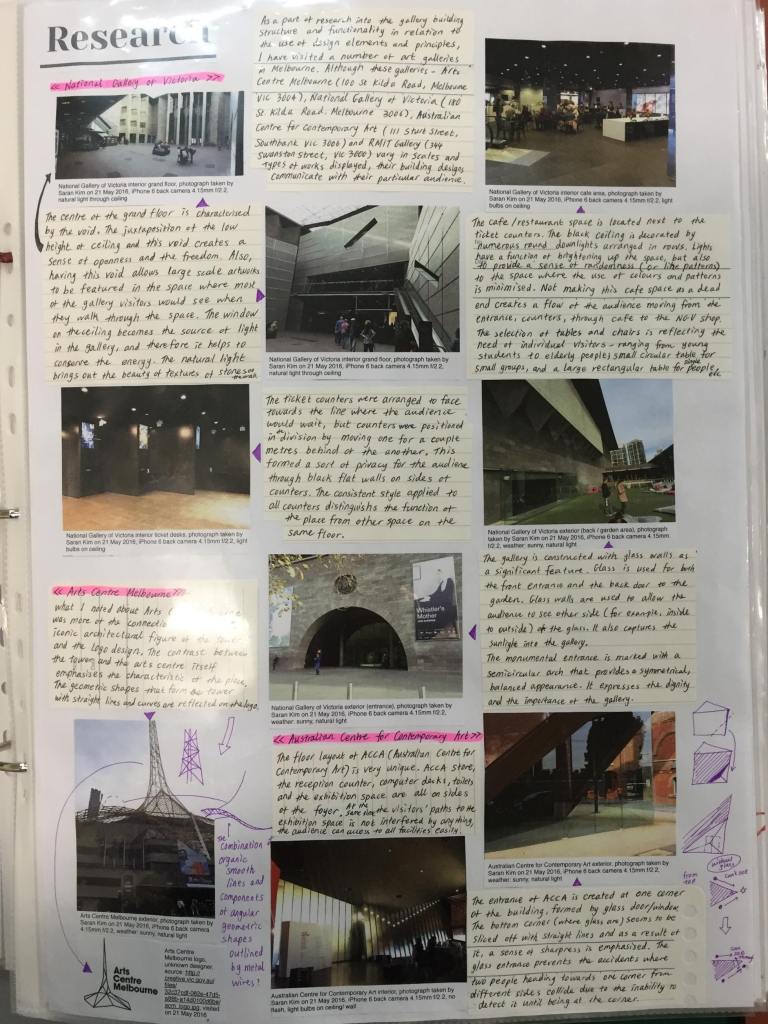
5. Site visit
Site visit is beneficial for understanding spatial attibutes of the precendents / potential site (where your design is going to be hypothetically located).
If you’re working on environmental design, you should visit the site and/or precedent buildings for inspiration. Here are tips:
- Choose a place to visit based on relevance (e.g. same typology of space, use of materials, scale of space, locations, similar site orientation (which way site is facing / where sun is at, etc.)
- Plan a day: make a list of things you want to check out
- Take lots of photos when you visit
- Take notes as you explore the place
6. Interview / survey
Do you know what the target audience / potential users want? Some of the best ways to get an insight into their preferences/wishes are to undertake an interview or set up a survey.
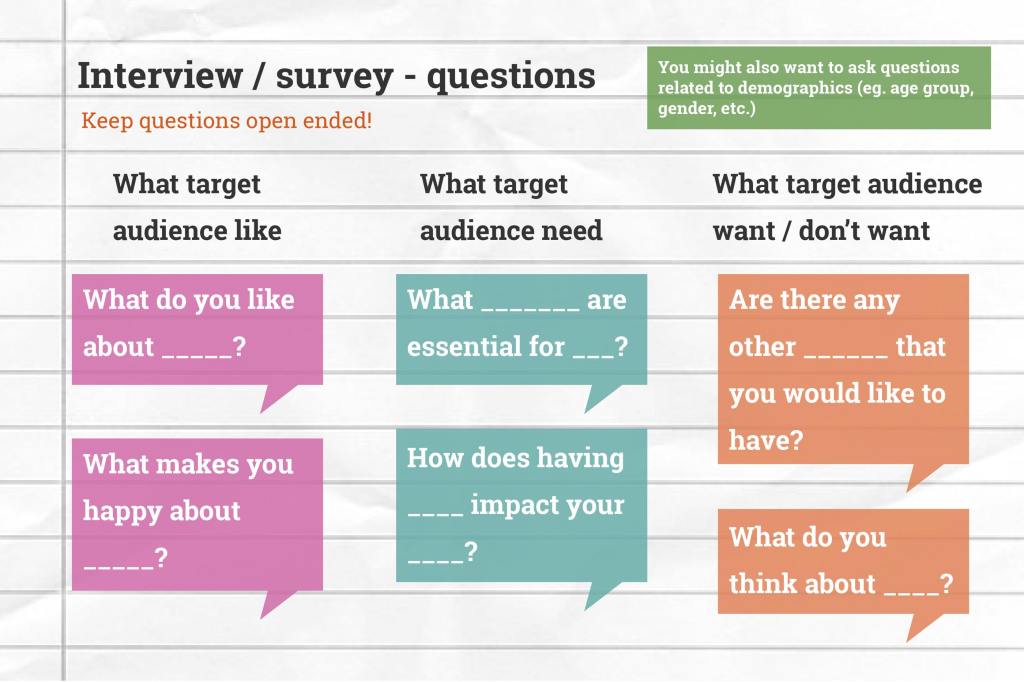
- Write down questions you want to ask
- Set up a survey platform (e.g. Google Forms, Typeform, SurveyMonkey, etc) /or email template
- Share the survey with/ send emails to target audience demographics
- Collect and evaluate responses
- Write down what you will take out of it

I’d recommend start working on it early in the research stage, so that you can allow some time for people to get back to you.
7. Observational drawings
You’re expected to demonstrate your ability to accurately depict the form, textures, tones and shadows, etc. of the real objects.
You should find objects or space that relate to your brief for the subject of the observational drawings.
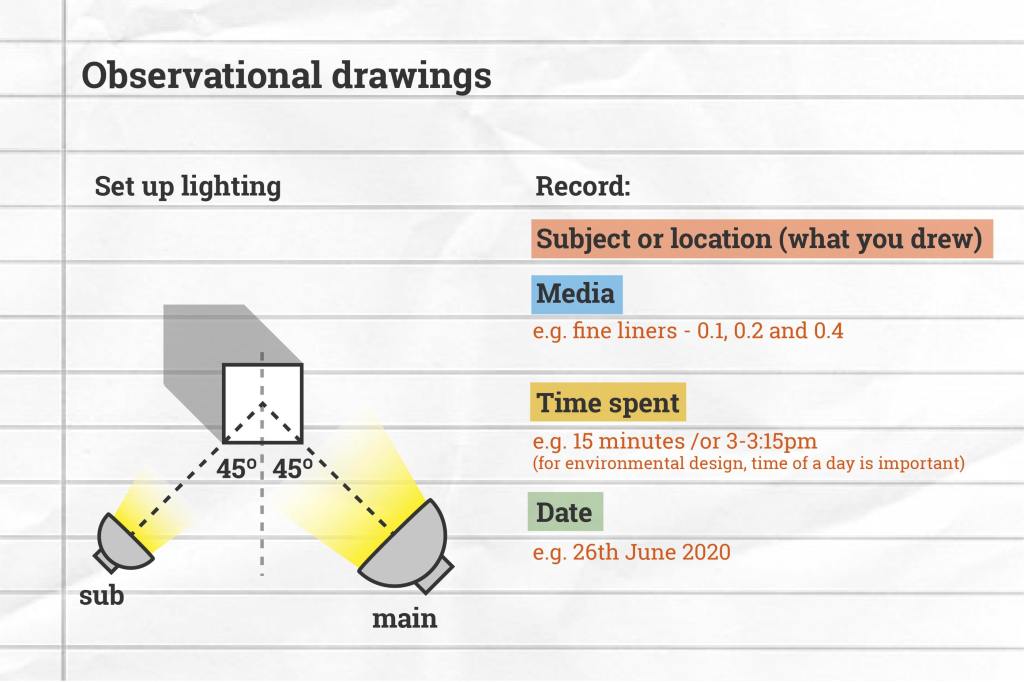
One way of drawing is to use a range of pencils with different hardness (e.g. HB, 2B, 4B).
Make sure to record:
- Subject (what you drew)
- Media (e.g. fine liners – 0.1, 0.2 and 0.4)
- Time spent (e.g. 15 minutes)
- Date (e.g. 26th June 2020)
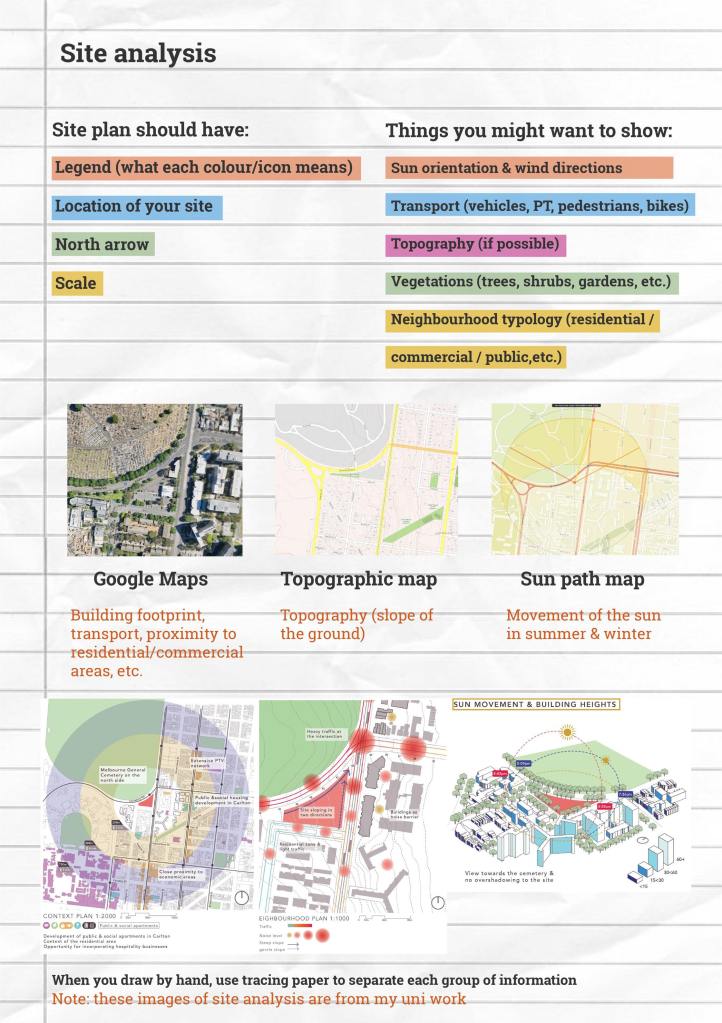
8. Site analysis (environmental design)
For environmental design, understanding the environmental contexts is very important. Apart from site visit (see above), you should:
- Look up the potential site on Google Maps, print out, measure the dimensions (scale is at the right bottom corner)
- Look up the topographic map here (click Map > Layer List > Contour)
- Look up the wind movement (Bureau of Meteorology)
- Trace the outline of the site & surrounding buildings on a paper / tracing paper.
- Mark:
- sun orientation & wind directions
- transport (vehicles, public transport, pedestrians, bicycles)
- topography (if possible)
- vegetations (trees, shrubs, gardens, etc)
9. Understanding scale & dimensions (environmental design)
For designing space, you should spend some time understanding how big / high / wide things & spaces around you are.

- Get a metal tape measure
- Firstly, measure and record your body, such as:
- width of a step
- length of your foot
- length of your arm (shoulder /elbow to fingers)
- total height
- height up to your pelvis
- height up to knees
- width/length of your hand & fingers
- width between extended thumb & pointing finger
- Secondly, measure and record:
- dimensions of your bed room /class room / dining room etc.
- height of room/s
- height & width of doors
- width of corridor
- depth of a table
- height of a chair (up to seating)
- dimensions of a chair seat
- etc…
- Thirdly, make a list of rooms you will be designing
- Then make estimate on how big the rooms need to be (look up precedents of similar building typology to measure dimensions)

