I cannot believe that this year has gone so quickly. The season of Christmas and a new year is coming, for me, it is the season of thanking my friends and teachers.
This year, I started making the Christmas cards after the school exams finished. I do not like to buy the Christmas cards at the store because I like to put in the effort and show my gratitude in the cards. My way of expressing my thoughts is not only through writing the comment on the card.
The basic materials for making the simple card is only three sheets of cardboard/paper:
- A piece of white cardboard
- A piece of coloured/patterned paper for the cover
- A piece of plain coloured paper for inside
Click the picture below to see the steps 🙂
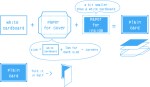
The white cardboard is not seen, but needs to be strong so the card does not bend easily. The paper for the cover should be larger than the white cardboard. Usually I add 1cm for each side of paper, for example, if the white cardboard is 10cm x 5cm, the paper to cover it should be 12cm x 7cm. I cut the corners off the cover paper and stick the edge of it on the inside of white cardboard. Then fold it in half. This is simple and you can make many different cards with this method.

The colours of the paper are very important because it can change the image of the card. I often use a light colour inside and a heavy pattern/colours outside. Normally I avoid similar colours (e.g. pink and red) for the paper because it is too boring.

I can sew a button on the cover and stick the string in between the papers when I put too many things inside and cannot close the card. The string can be wound around the button, it is called ‘Tama-himo (ball with string?)’.

These small techniques can create an original, professional card that expresses your full feelings towards the person who you want to thank. I hope this article helps you…!

